One of the big advantages of Swift is that it gives you access to all Cocoa APIs and lets you use them in some very flexible ways.
One of those is the possibility to use Swift as a general OS “scripting” language - instead of bash, PyObjC or C or any other option that you might have opted for in the past. Moreover, you can do that entirely from outside of XCode - so write your Swift program in any editor and then simply use Terminal to execute it, as if it was pure script.
The obvious advantage of such approach is that you now have the same single language to handle iOS programming, OS X app programming and generic system/automation tasks that you might want to perform from the command line.
Let’s have a look.
Swift REPL 🔗
Swift ships with the REPL (Read-Evaluate-Print Loop) which lets you execute blocks of code in an interactive way, within the context of a single session. This concept, already available in a number of other languages, is a terrific experimental playground, as well as a great addition to the debugging experience. You can launch a new REPL session from the Terminal, or break into the REPL from a stopped application.
There are already some terrific resources on the web that show you how to set up your Terminal to be able to run Swift REPL. In short, to do that, you need to set you active developer directory to point to XCode 6 installation.
sudo xcode-select -switch /Applications/Xcode6-Beta.app/Contents/Developer
With this in place, you can now start Swift REPL directly from the Terminal using the following:
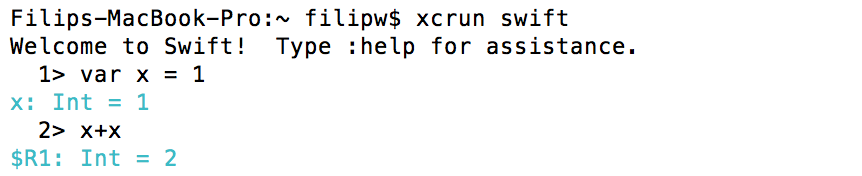
xccrun swift
This should give you the following screen.
Alternatively, Rob suggests to alias your XCode version as swift to avoid swicthing between profiles. You may choose to do that if that feels more comfortable to you.
Executing Code With Swift REPL 🔗
Swift’s command line compiler not only allows you to use the REPL, but also allows you to execute arbitrary snippets of Swift code, without any previous packaging into Mach-O executable or any upfront compilation (well the compilation does happen, but it’s happening together with execution in that case).
This is of great significance, because it could effectively eliminate any need (or at least some of the need) for bash scripting or for anything that you’d want to achieve with the XCode Command Line Tool project template - as the exact same thing could be done with much less ceremony, through a bit Swift.
Swift, when run from command line, has a number of options shown below:
Filips-MacBook-Pro:swift-playground filipw$ xcrun swift -help
OVERVIEW: Swift compiler

USAGE: swift [options] <inputs>

MODES:
-dump-ast Parse and type-check input file(s) and dump AST(s)
-dump-parse Parse input file(s) and dump AST(s)
-emit-assembly Emit assembly file(s) (-S)
-emit-bc Emit LLVM BC file(s)
-emit-executable Emit a linked executable
-emit-ir Emit LLVM IR file(s)
-emit-library Emit a linked library
-emit-object Emit object file(s) (-c)
-emit-silgen Emit raw SIL file(s)
-emit-sil Emit canonical SIL file(s)
-integrated-repl Integrated REPL mode
-i Immediate mode
-lldb-repl LLDB-enhanced REPL mode
-parse Parse input file(s)
-print-ast Parse and type-check input file(s) and pretty print AST(s)
-repl REPL mode

OPTIONS:
-application-extension Restrict code to those available for App Extensions
-arch <arch> Compile for architecture <arch>
-assert-config <value> Specify the assert_configuration replacement. Possible values are Debug, Release, Replacement.
-D <value> Specifies one or more build configuration options
-emit-dependencies Emit Make-compatible dependencies files
-emit-module-path <path> Emit an importable module to <path> -emit-module Emit an importable module
-emit-objc-header-path <path> Emit an Objective-C header file to <path> -emit-objc-header Emit an Objective-C header file
-framework <value> Specifies a framework which should be linked against
-F <value> Add directory to framework search path
-g Emit debug info
-help Display available options
-import-underlying-module
Implicitly imports the Objective-C half of a module
-I <value> Add directory to the import search path
-j <n> Number of commands to execute in parallel
-L <value> Add directory to library link search path
-l<value> Specifies a library which should be linked against
-module-cache-path <value>
Specifies the Clang module cache path
-module-link-name <value>
Library to link against when using this module
-module-name <value> Name of the module to build
-nostdimport Don't search the standard library import path for modules
-output-file-map <path> A file which specifies the location of outputs
-o <file> Write output to <file>
-parse-as-library Parse the input file(s) as libraries, not scripts
-parse-sil Parse the input file as SIL code, not Swift source
-save-temps Save intermediate compilation results
-sdk <sdk> Compile against <sdk>
-serialize-diagnostics Serialize diagnostics in a binary format
-target-cpu <value> Generate code for a particular CPU variant
-target-feature [+-]<feature-name>
Generate code with a particular CPU feature enabled or disabled
-target <value> Generate code for the given target
-version Print version information and exit
-v Show commands to run and use verbose output
-Xcc <arg> Pass <arg> to the C/C++/Objective-C compiler
-Xfrontend <arg> Pass <arg> to the Swift frontend
-Xlinker <value> Specifies an option which should be passed to the linker
-Xllvm <arg> Pass <arg> to LLVM.
What’s interesting for us in this case, is the -i switch - immediate mode. This lets us pass a path to a Swift file and it will be compiled and executed straight away, as if it was a bash script.
To give you an example, consider the following Swift code, which is setting a wallpaper on your Mac. The code is very simple - an NSURL pointing to a JPG file on my disk, which is then used with the setDesktopImageURL and the current screen to give my Mac a new desktop background image. If the operation succeeds, a message is printed.
import Cocoa
import Appkit

var imgurl : NSURL = NSURL.fileURLWithPath("/Users/filipw/Downloads/space.jpg")
var error : NSError?
var workspace = NSWorkspace.sharedWorkspace()
var screen = NSScreen.mainScreen()

var result : Bool = workspace.setDesktopImageURL(imgurl, forScreen: screen, options: nil, error: &error)

if result {
println("Wallpaper set!")
}
To run this from the Terminal you also have to specify the relevant SDK, in our case, a Mac OS X one, and pass the path to the file through the aforementioned -i flag.
xcrun swift -sdk $(xcrun -show-sdk-path -sdk macosx) -i mySwiftFile.swift
Here is the output - and, obviously the wallpaper is changed correctly.
![]()
This is by no means revolutionary - as the same goal could be achieved with a Command Line XCode project, which could be written in Objective-C, C or C++. In fact, Command Line Tool project template also allows you to specify Swift as a language. But it is very neat regardless, in a sense that you are free to “script” from any editor, in a modern language and easily execute without building Mach-O executable. Moreover, Swift is really well suited - with it’s low ceremony and simplicity - for such script-like usage.
Summary 🔗
You can use Swift as general purpose scripting language for all kinds of OS tasks or any automation scripts; the benefit of that will be the possibility to easily access Cocoa APIs and use the same Swift language that you’d use for your day-to-day OS X and iOS development. Moreover, you are free to do that without XCode, and without having to compile any code upfront.