In the last post we covered how UniFFI can be used to elegantly create C bindings and generate bridge C# code that allows for calling native code written in Rust from a C# program. Today, we are going to build upon that, and we will show - in a true cross platform fashion - how the same core Rust library we used last time around, and the same toolchain that we have already set up, can be used to generate similar bindings for Swift. This will enable us to reuse our native Rust code in an iOS or macOS application.
Getting started with Swift bindings 🔗
Since we will not introduce any new Rust code in this article, I recommend you review the previous blog post to make yourself familiar with the sample used there. It is a QR code generator, which we can call over FFI.
In order to get going with Swift, we have to first make sure that the UniFFI bindings for Swift are properly generated. Thankfully, all of that was already set up last time around - even though we did not use them for anything beyond C# then. Our build.rs looked like this:
fn main() {
    let udl_file = "./src/rust-lib.udl";
    let out_dir = "./bindings/";
    uniffi_build::generate_scaffolding(udl_file).unwrap();
    generate_bindings(udl_file.into(),
        None,
        vec!["swift", "python", "kotlin"],
        Some(out_dir.into()),
        None,
        true).unwrap();

    Command::new("uniffi-bindgen-cs").arg("--out-dir").arg(out_dir).arg(udl_file).output().expect("Failed when generating C# bindings");
}
We had it configured to generate bindings for Swift, Python and Kotlin (using the official built-in support in UniFFI for those languages), and for C#, using the uniffi-bindgen-cs extension. As a result, upon building our Rust program, we should already have the necessary Swift bindings in the ./bindings folder (relative to the build.rs file).
And indeed, if we look in there, we should see three files:
- rust_lib.swift - containing the actual high level Swift code that we will be calling
- rust_libFFI.h - the header file exposing the generated functions, types and constants from the native code that rust_lib.swift relies on and wraps into friendly Swift types, and which the linker needs to link against
- rust_lib.modulemap - part of the Clang’s Modules feature, which includes the rust_libFFI.h and exports all of its declarations as part of the public interface of the module. This is an alternative to manually including the header file in the source files
Building for iOS and other Apple targets 🔗
In order for the whole thing to work, we need to first compile our code for the necessary Apple targets. For the purpose of this post we shall choose three of them (they must be preinstalled with rustup):
cargo build --target aarch64-apple-darwin --release
cargo build --target aarch64-apple-ios --release
cargo build --target aarch64-apple-ios-sim --release
They allow us to produce binaries that can run on arm64 macOS, iOS/iPadOS and the iOS simulator on arm64 macOS. There are separate x64 target for maOS and for the iOS simulator when developing on x64 macOS but since x64 Macs are effectively phased out by now, we shall skip them here (though you are free to choose them if you need to).
Once the build succeeds we should have two copies of our Rust library in each of the three ./target/{target name}/release folders - one compiled as static (.a extension) and one as dynamic (.dylib extension) library.
So we do have the native libraries, we do have the bindings and the headers - the question at this stage is how to bring this all together into the app?
Including the bindings in iOS application 🔗
Let’s start with a basic empty iOS application created from the default Xcode template. Once that is in place, we have to include the generated bindings into our app. This applies to the rust_lib.swift and rust_libFFI.h files which we add to the project (the module file is not needed yet). They do not need to be copied and can be reference via path to the bindings folder, this way when the Rust code changes and they change, it would be automatically reflected in the app.
At this stage the code will not compile yet, because rust_lib.swift relies on the header which our application does not understand yet, and which in turn relies on the library that is not imported yet too.
So, next, we have to import the native library - and this is where the first problem appears - we have compiled it for three targets, so which one to choose? Since it’s easiest to get going with the simulator let’s use the one from the aarch64-apple-ios-sim for now. We will use the static versions (.a) throughout this post.
To import it, we need to go to our application target and then under General > Frameworks, Libraries, and Embedded Content, click the plus icon, and then choose our library using the “Add files” dialogue. Next, a series of steps are needed to ensure the compiler and linker can work together to make the library usable.
- Build Settings > Objective-C Bridging Header - add the path to the generated rust_libFFI.h file
- Build Settings > Search Paths - add the path to folder containing the native library
- Build Phases > Headers - make sure the header is there
- Build Phases > Link Binary With Libraries - make sure the library is there (this should happen automatically)
With this in place the code should be able to compile the code successfully, and we can start writing code against the bindings from rust_lib.swift.
Writing code against native dependency 🔗
Similarly to the C# bindings we discussed last time, the Swift bindings feel like normal regular Swift dependency. For example, our encode_text function from Rust can be called by invoking the following function from rust_lib.swift:
public func `encodeText`(`text`: String, `ecl`: QrCodeEcc) throws -> QrCode {
    return try FfiConverterTypeQrCode.lift(
        try rustCallWithError(FfiConverterTypeQrError.self) {
            rust_lib_e897_encode_text(
                FfiConverterString.lower(`text`),
                FfiConverterTypeQrCodeEcc.lower(`ecl`), $0)
        }
    )
}
It returns QrCode which originally was defined in Rust as a Rust struct, and whose Swift representation can also be found in the same file (note: the call is malformatted up a little because that is how the generator generates it - not because the blog messed it up!):
public protocol QrCodeProtocol {
    func `size`()  -> Int32
    func `getModule`(`x`: Int32, `y`: Int32)  -> Bool
}

public class QrCode: QrCodeProtocol {
    fileprivate let pointer: UnsafeMutableRawPointer

    // TODO: We'd like this to be `private` but for Swifty reasons,
    // we can't implement `FfiConverter` without making this `required` and we can't
    // make it `required` without making it `public`.
    required init(unsafeFromRawPointer pointer: UnsafeMutableRawPointer) {
        self.pointer = pointer
    }

    deinit {
        try! rustCall { ffi_rust_lib_e897_QrCode_object_free(pointer, $0) }
    }


    public func `size`()  -> Int32 {
        return try! FfiConverterInt32.lift(
            try!
    rustCall() {

    rust_lib_e897_QrCode_size(self.pointer, $0
    )
}
        )
    }
    public func `getModule`(`x`: Int32, `y`: Int32)  -> Bool {
        return try! FfiConverterBool.lift(
            try!
    rustCall() {

    rust_lib_e897_QrCode_get_module(self.pointer,
        FfiConverterInt32.lower(`x`),
        FfiConverterInt32.lower(`y`), $0
    )
}
        )
    }

}
The function expects a String argument that will represent the text to be encoded into QR code and the encoding level which - originally an enum in Rust - is represented by Swift enum:
public enum QrCodeEcc {
    case `low`
    case `medium`
    case `quartile`
    case `high`
}

extension QrCodeEcc: Equatable, Hashable {}
Finally, just like in C#, there is also the error type which we defined as possibly being thrown when invoking Rust code over FFI:
public enum QrError {
    case ErrorMessage(`errorText`: String)
}
With this knowledge, we can go ahead and implement a simple UI that will allow us to prompt user for some string input and which will invoke the native Rust QR generation function. This is shown in the SwiftUI snippet below:
struct ContentView: View {
@State var qrCode: QrCode?
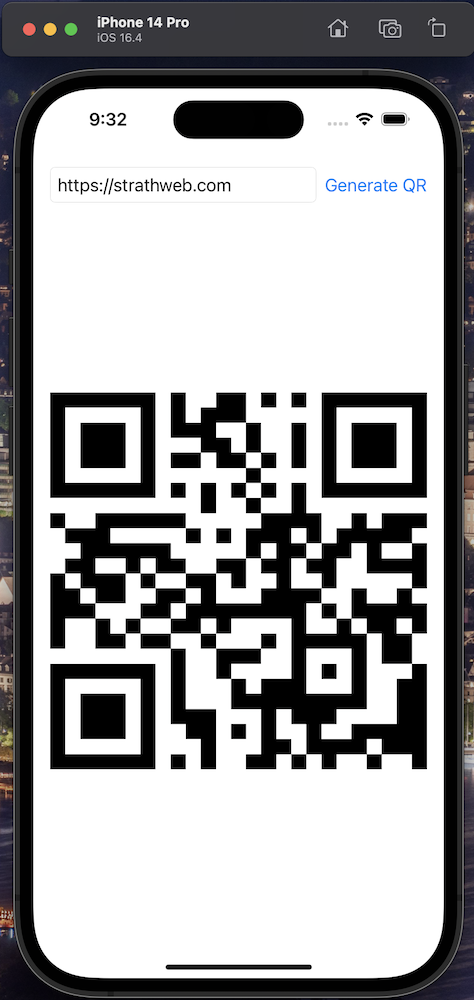
@State var text: String = "https://strathweb.com"
var body: some View {
VStack {
HStack {
TextField("Enter the URL", text: $text)
.textFieldStyle(RoundedBorderTextFieldStyle())
.frame(maxWidth: .infinity)
Button("Generate QR") {
do {
print(text)
qrCode = try encodeText(text: text, ecl: .medium)
} catch {
print(error)
}
}
}.padding()
Spacer()
if let qrCode = qrCode {
QrCodeView(qrCode: qrCode)
.aspectRatio(1, contentMode: .fit)
.padding()
Spacer()
}
}
}
}
struct QrCodeView: View {
let qrCode: QrCodeProtocol
let moduleCoordinates: [Int]
init(qrCode: QrCodeProtocol) {
self.qrCode = qrCode
self.moduleCoordinates = Array(0..<Int(qrCode.size()))
}
var body: some View {
GeometryReader { geometry in
ForEach(moduleCoordinates, id: \.self) { x in
ForEach(moduleCoordinates, id: \.self) { y in
if qrCode.getModule(x: Int32(x), y: Int32(y)) {
Rectangle()
.fill(Color.black)
.frame(width: geometry.size.width / CGFloat(qrCode.size()),
height: geometry.size.height / CGFloat(qrCode.size()))
.offset(x: CGFloat(x) * geometry.size.width / CGFloat(qrCode.size()),
y: CGFloat(y) * geometry.size.height / CGFloat(qrCode.size()))
}
}
}
}
}
}
The UI is not the greatest in the world, but it will serve its purpose - to be a simple demo only. The cool thing is, of course, looking at this UI code only, there is really no way of telling that there is FFI behind scenes, as the entire memory management and interaction with native library is abstracted by the generated UniFFI bindings. In our case, when the user taps the button, we dispatch the FFI call.
Once the QR code is generated, we can use the returned object to draw it nicely on the screen. This is similar to how we did that in the C# example in the previous post - where we did that in the console. In this case we can use basic drawing capabilities of SwiftUI.
The final result should look like this:
Switching to a framework 🔗
So this worked out great, but we still have one problem to address - namely, we specifically used the version of our native library compiled for the simulator - so it will not work on real iOS device, nor would it if we tried to cross compile the app for macOS.
This is where frameworks can help us. Instead of directly referencing a specific native library, we can bundle several libraries, for different targets, together into one framework, and the app will then automatically use the correct variant depending on how it is compiled.
To use our native Rust library as framework, we need to undo all the changes we did to our Xcode project and start from scratch - the only things we can keep are:
- rust_lib.swift included in our project (not the header though)
- our UI code as it will not change
More specifically, all the build related changes to the target must be reverted.
Next, we have to create the framework, which can be done with the script shown below. The paths assume the script is executed from the root folder of our Rust library, so where the Cargo.toml is, and that the app sits one level higher, inside swift-app/rust-swift.interop.sample folder. If this does not make sense, please have a look at the source code.
HEADERPATH="bindings/rust_libFFI.h"
TARGETDIR="target"
OUTDIR="../swift-app/rust-swift.interop.sample"
RELDIR="release"
NAME="rust_lib"
STATIC_LIB_NAME="lib${NAME}.a"
NEW_HEADER_DIR="bindings/include"

cargo build --target aarch64-apple-darwin --release
cargo build --target aarch64-apple-ios --release
cargo build --target aarch64-apple-ios-sim --release

mkdir -p "${NEW_HEADER_DIR}"
cp "${HEADERPATH}" "${NEW_HEADER_DIR}/"
cp "bindings/rust_libFFI.modulemap" "${NEW_HEADER_DIR}/module.modulemap"

rm -rf "${OUTDIR}/${NAME}_framework.xcframework"

xcodebuild -create-xcframework \
    -library "${TARGETDIR}/aarch64-apple-darwin/${RELDIR}/${STATIC_LIB_NAME}" \
    -headers "${NEW_HEADER_DIR}" \
    -library "${TARGETDIR}/aarch64-apple-ios/${RELDIR}/${STATIC_LIB_NAME}" \
    -headers "${NEW_HEADER_DIR}" \
    -library "${TARGETDIR}/aarch64-apple-ios-sim/${RELDIR}/${STATIC_LIB_NAME}" \
    -headers "${NEW_HEADER_DIR}" \
    -output "${OUTDIR}/${NAME}_framework.xcframework"
The script builds all three targets and then copies the header and module map files into a temporary location (while also renaming the module map file to a generic module.modulemap). It then uses xcodebuild to create the framework consisting of all three variants of the static native library, passing in the temporary headers (and modulemap) location to each of them. If you chose to use the additional x64 targets, which we did not do here, then similar targets which are using different architectures (x64 and arm64 macOS, x64 and arm64 simulators) must be merged together using lipo prior to including them into the framework.
At the end, we do have a rust_lib_framework.xcframework created and incorporating it into our app is as simple as going to our main application target, General > Frameworks, Libraries, and Embedded Content. There we click the plus icon, and then choose our framework using the “Add files” dialogue. We need to verify that the framework showed up under Build Phases > Link Binary With Libraries - which should happen automatically. If it didn’t, we have to add it manually there again.
No other changes should be necessary, no header management or any additional search paths should be modified. The code should now simply recompile without issues - and the application should now work both on the phone and in the simulator (and or macOS, should you cross compile).
The source code for this blog post is available on Github.